Show Blogger Image only in Homepage and Hide it in Post Page
Here's a really easy trick that will make a Blogger image show only in homepage and hide it in Blogger posts. In order to make images appear only on homepage, we need to add a simple CSS code snippet in the template and then use the hidepic class each time we want to hide an image.

Step 2. Click anywhere inside the code area and press the CTRL + F keys to open the search box:

Step 3. Type or paste the following tag inside the search box and hit Enter to find it:
Step 4. Once you found the tag, paste the following CSS code just BELOW it.
Note: the html code should be on the exact location where your image has been placed. For instance, if the image is in the middle of the content, then the code should be found in the middle of the text code. This might be a bit tricky at first, but we can use CTRL + F to search for that specific area.
Also, please make sure that you are in the "Compose" tab when uploading your images, otherwise the image code will omit the div containing the "separator" class.
Step 6. Replace the separator CSS class with hidepic - see the screenshot below for more info:

Once you replaced it, click the "Publish" or "Update" button.
So this is how we can easily show Blogger image only on homepage and hide it in post pages. Enjoy!
Hide Image in Blogger Post and Show it Only on Homepage
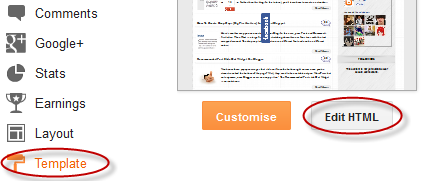
Step 1. First, log into your Blogger account and click on your blog. Then go to "Template" and press the "Edit HTML" button.
Step 2. Click anywhere inside the code area and press the CTRL + F keys to open the search box:

Step 3. Type or paste the following tag inside the search box and hit Enter to find it:
]]></b:skin>
Step 4. Once you found the tag, paste the following CSS code just BELOW it.
<b:if cond='data:blog.pageType != "index"'>Step 5. Now that we added the CSS code to hide (display:none;) the images with hidepic class, click the "Save Template" button to save the code.
<style>.hidepic{display: none;}</style>
</b:if>
How it works?
Each time you create a post and need to hide a specific picture, switch to the HTML tab to see the HTML code of the image, which will look something like this:<div class="separator" style="clear: both; text-align: center;">
<a href="https://blogger.googleusercontent.com/img/b/R29vZ2xl/AVvXsEgXqT8YgQFiuFI0Zl5gzoVXl5Cy2Ek_Fqjyx2rI1aj1b0MmJIu96yCTfREScUnnmIaJDsnuoB2b-tY3WA0c1QStw_Sqhhi8eUwlEE3d0kngsUd9HDzGEB2d6jh0wk1aUgnSxoXWFPrNX9U/s1600/fire_bird_by_fhrankee-d32af8v.png" imageanchor="1" style="margin-left: 1em; margin-right: 1em;"><img border="0" height="320" src="https://blogger.googleusercontent.com/img/b/R29vZ2xl/AVvXsEgXqT8YgQFiuFI0Zl5gzoVXl5Cy2Ek_Fqjyx2rI1aj1b0MmJIu96yCTfREScUnnmIaJDsnuoB2b-tY3WA0c1QStw_Sqhhi8eUwlEE3d0kngsUd9HDzGEB2d6jh0wk1aUgnSxoXWFPrNX9U/s320/fire_bird_by_fhrankee-d32af8v.png" width="320" /></a></div>
Note: the html code should be on the exact location where your image has been placed. For instance, if the image is in the middle of the content, then the code should be found in the middle of the text code. This might be a bit tricky at first, but we can use CTRL + F to search for that specific area.
Also, please make sure that you are in the "Compose" tab when uploading your images, otherwise the image code will omit the div containing the "separator" class.
Step 6. Replace the separator CSS class with hidepic - see the screenshot below for more info:

Once you replaced it, click the "Publish" or "Update" button.
So this is how we can easily show Blogger image only on homepage and hide it in post pages. Enjoy!


Post a Comment