How to add a thumbnail image/photo gallery in Blogger 2017
For those who would like to show pictures in an image gallery, here's a beautiful gallery made with JavaScript and CSS. This image gallery displays the available thumbnails either vertically or horizontally on top of the chosen picture, thus making it easier for you to pick different images on mouse click.
With the help of CSS, we can make the <img> element to display on same position with the rest of the thumbs and style the thumbnails as small blocks with a defined height and width. The script will add a click-event for each <li> object that changes it's child's <img> visibility and will assign an "active" class name to the <li>.

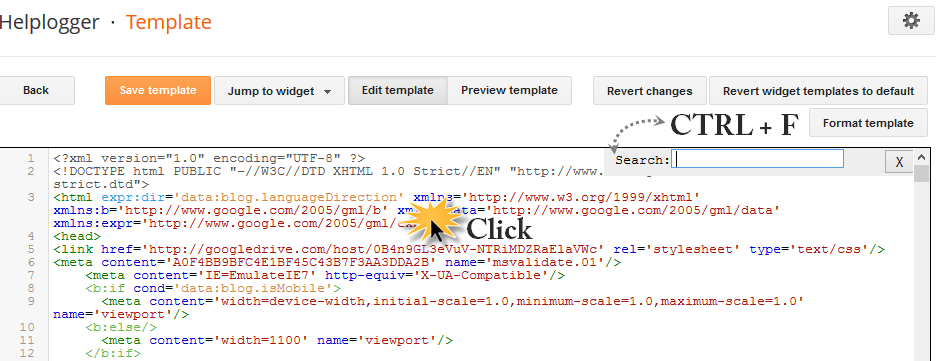
Step 2. Click anywhere inside the code area and press the CTRL + F keys to open the search box:
Step 3. Type the following tag inside the search box and hit Enter to find it:


In #jquery-gallery we have the width of the container for the thumbnails (200px), so that they display in two rows and for this we need to calculate the width of the thumbnail (80px) plus the margins between them.
The left declaration of #jquery-gallery li img is to move the larger thumbnail that shows on mouse click so that it doesn't overlap with the smaller thumbnails.
Step 5. Paste the code of the chosen style just above the </head> tag.
Step 6. Now above the same </head> tag, add this script:
Step 7. Finally, save the changes by clicking the "Save template" button.
And here's the HTML code providing a normal list with the image-gallery ID, enclosed within a DIV with a relative position in order to avoid side effects of other pre-existing positions.
Step 8. Paste the below HTML to where you want to display the gallery by going either to "Layout" and adding a new gadget (click on the "Add a gadget" link and choose "HTML/JavaScript" option), or inside a post/page in the HTML section.
Example:
In case you need to make the pictures clickable, add this HTML structure instead:
Update: To add captions, please include the lines in orange and then replace the "Caption" with the text that you want to appear on each picture:
Save the widget or publish your page and you're done adding the thumbnail image / photo gallery in Blogger.
With the help of CSS, we can make the <img> element to display on same position with the rest of the thumbs and style the thumbnails as small blocks with a defined height and width. The script will add a click-event for each <li> object that changes it's child's <img> visibility and will assign an "active" class name to the <li>.
How to Add Image Gallery with Thumbnails to Blogger
Step 1. Log in to your Blogger account, select your blog and go to "Template", press the "Edit HTML" button.Step 2. Click anywhere inside the code area and press the CTRL + F keys to open the search box:
Step 3. Type the following tag inside the search box and hit Enter to find it:
</head>Step 4. Now pick one of the styles below and copy the code below it:
<style type='text/css'>
#image-gallery {display: none;}
#jquery-gallery {padding:0;margin:0;list-style: none; width: 500px;}
#jquery-gallery li {width:84px; height: 80px;background-size: 100%;-webkit-background-size: cover;-moz-background-size: cover; -o-background-size: cover;background-size: cover;margin-right: 10px; border: 3px solid #fff; outline: 1px solid #E3E3E3; margin-bottom: 10px;opacity: .5; filter:alpha(opacity=50); float: left; display: block; }
#jquery-gallery li img { position: absolute; top: 100px; left: 0px; display: none;}
#jquery-gallery li.active img { display: block; border: 3px solid #fff; outline: 1px solid #E3E3E3; width:490px; max-height: 375px;}
#jquery-gallery li.active, #jquery-gallery li:hover { outline-color: #DFDFDF; opacity: .99;filter:alpha(opacity=99);}
#gallery-caption {background: rgba(0, 0, 0, 0.3);color: #fff;font-size: 16px;font-weight: bold;left: 3px;position: absolute;text-align: center;top: 103px;width: 490px;text-transform: uppercase;}
</style>
<style type='text/css'>Note: The display: none; for the first ID (#image-gallery) is to prevent images appear with their actual size before they go inside the gallery container.
#image-gallery { display: none; }
#jquery-gallery {padding:0;margin:0;list-style: none; width: 200px; }
#jquery-gallery li {background-size: 100%;-webkit-background-size: cover;-moz-background-size: cover; -o-background-size: cover;background-size: cover;margin-right: 10px; width: 80px; height: 80px; border: 3px solid #fff; outline: 1px solid #ddd; margin-right: 10px; margin-bottom: 10px; opacity: .5;filter:alpha(opacity=50); float: left; display: block; }
#jquery-gallery li img { position: absolute; top: 0px; left: 200px; display: none; }
#jquery-gallery li.active img { display: block; width:370px; border: 3px solid #fff; outline: 1px solid #E3E3E3; }
#jquery-gallery li.active, #jquery-gallery li:hover { outline-color: #bbb; opacity: .99;filter:alpha(opacity=99);}
#gallery-caption {background: rgba(0, 0, 0, 0.3);color: #fff;font-size: 16px;font-weight: bold;text-transform: uppercase;margin: 0 -17px;position: absolute;right: 0;text-align: center;top: 3px;width: 370px;}
</style>
In #jquery-gallery we have the width of the container for the thumbnails (200px), so that they display in two rows and for this we need to calculate the width of the thumbnail (80px) plus the margins between them.
The left declaration of #jquery-gallery li img is to move the larger thumbnail that shows on mouse click so that it doesn't overlap with the smaller thumbnails.
Step 5. Paste the code of the chosen style just above the </head> tag.
Step 6. Now above the same </head> tag, add this script:
<script type='text/javascript'>Basically, what this script does is to check if there is any ID named "image-gallery" and get the different list items that may exist within it. These elements will be displayed as thumbnails and a function will decide what to do once they are clicked. So, each time we click on a thumbnail, the "active" class will be assigned and the thumbnail should be visible in the larger container.
//<![CDATA[
var gal = {
init : function() {
if (!document.getElementById || !document.createElement || !document.appendChild) return false;
if (document.getElementById('image-gallery')) document.getElementById('image-gallery').id = 'jquery-gallery';
var li = document.getElementById('jquery-gallery').getElementsByTagName('li');
li[0].className = 'active';
for (i=0; i<li.length; i++) {
li[i].style.backgroundImage = 'url(' + li[i].getElementsByTagName('img')[0].src + ')';
li[i].title = li[i].getElementsByTagName('img')[0].alt;
gal.addEvent(li[i],'click',function() {
var im = document.getElementById('jquery-gallery').getElementsByTagName('li');
for (j=0; j<im.length; j++) {
im[j].className = '';
}
this.className = 'active';
document.getElementById('gallery-caption').innerHTML = this.title;
});
}
},
addEvent : function(obj, type, fn) {
if (obj.addEventListener) {
obj.addEventListener(type, fn, false);
}
else if (obj.attachEvent) {
obj["e"+type+fn] = fn;
obj[type+fn] = function() { obj["e"+type+fn]( window.event ); }
obj.attachEvent("on"+type, obj[type+fn]);
}
}
}
gal.addEvent(window,'load', function() {
gal.init();
});
//]]>
</script>
Step 7. Finally, save the changes by clicking the "Save template" button.
And here's the HTML code providing a normal list with the image-gallery ID, enclosed within a DIV with a relative position in order to avoid side effects of other pre-existing positions.
Step 8. Paste the below HTML to where you want to display the gallery by going either to "Layout" and adding a new gadget (click on the "Add a gadget" link and choose "HTML/JavaScript" option), or inside a post/page in the HTML section.
<div style="position:relative;">Note: if elements on your page overlap with this gallery, you might need to add the height declaration after "position: relative;". The value of height depends on the size of your gallery.
<ul id="image-gallery">
<li><img src="IMAGE-URL1" /></li>
<li><img src="IMAGE-URL2" /></li>
<li><img src="IMAGE-URL3" /></li>
<li><img src="IMAGE-URL4" /></li>
<li><img src="IMAGE-URL5" /></li>
</ul>
</div>
Example:
<div style="position:relative; height: 500px;">Change IMAGE-URL1 with the image URL. If you don't know how to get the address of an image, see this tutorial: How to Upload Images and Get the URL
In case you need to make the pictures clickable, add this HTML structure instead:
<div style="position:relative;">Again, here you need to replace the page-URL text with the URL of your page/post.
<ul id="image-gallery">
<li><a href="page-URL"><img src="IMAGE-URL1" /></a></li>
<li><a href="page-URL"><img src="IMAGE-URL2" /></a></li>
<li><a href="page-URL"><img src="IMAGE-URL3" /></a></li>
<li><a href="page-URL"><img src="IMAGE-URL4" /></a></li>
<li><a href="page-URL"><img src="IMAGE-URL5" /></a></li>
</ul>
</div>
Update: To add captions, please include the lines in orange and then replace the "Caption" with the text that you want to appear on each picture:
<div style="position:relative;">
<ul id="image-gallery">
<li><a href="page-URL"><img alt="Caption" src="IMAGE-URL1" /></a></li>
<li><a href="page-URL"><img alt="Caption" src="IMAGE-URL2" /></a></li>
<li><a href="page-URL"><img alt="Caption" src="IMAGE-URL3" /></a></li>
<li><a href="page-URL"><img alt="Caption" src="IMAGE-URL4" /></a></li>
<li><a href="page-URL"><img alt="Caption" src="IMAGE-URL5" /></a></li>
</ul>
<div id="gallery-caption"></div>
</div>
Save the widget or publish your page and you're done adding the thumbnail image / photo gallery in Blogger.


Post a Comment